Tutorial 3 . Cameras on Eli application
- Camera snapshots folder. Select folder where can be saved picture from camera. You can save picture from actual camera view by click on menu Cameras→Snapshot (or press F2 key) . Folder must have write permission for actual user.
- File name . Select name of snapshot picture. Picture will be saved with this name + index ( which is set in the next line)
- Index. Start index number. When you start Camera view and save actual view to picture, picture file name with be add with actual index and index is incremented to tho next picture.
- View camera loop time. Set time interval between camera frames in milliseconds. If this value is too small you will have error during camera view. Minimal value depends on your computer speed. If you set 100ms, you will have 10 frames to one seconds.
- Update all. Click on this menu update all set parameters.
Menu Cameras→View Camera display list where you can select which camera picture will be displayed. Cameras are labeling Video_0 till Video_19 according operating system. If you have only one camera connected it is Video_0. Actual camera picture will display in picture window. If you want to stop camera view click menu Cameras→Stop camera. If you want make picture from actual view click on menu Cameras→Snapshot (or press F2)
Menu Cameras→View Camera undistor display camera selection dialog and select calibration file dialog. Picture from selected camera will be recalculated be calibration file and corrected picture will display in picture window. Calibration file is created during camera calibration process. This process will be described in the next paragraph. If you want to stop camera view click menu Cameras→Stop camera. If you want make picture from actual view click on menu Cameras→Snapshot (or press F2).
At first you must print calibration pattern. Calibration pattern file is stored in Eli application folder “share/Eli/calibration”. Eli used 9x6 cheeseboard pattern. Print it and put it on flat plate (use glue for fix).
- Measure cheeseboard square edge dimension in unit which you want to use in application (millimeters or inch).
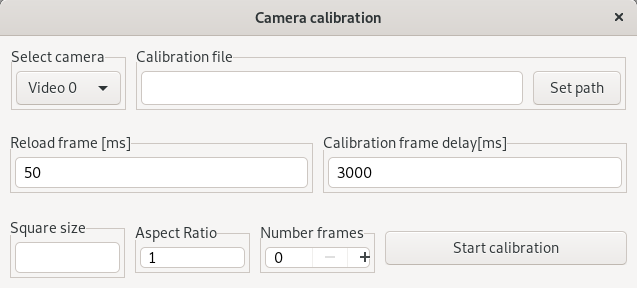
- Open menu Cameras→Calibrate Camera.

- Select camera which you want to calibrate in menu “Select camera”.
- Select calibration file where calibration results will be stored (Click on button Set path). Selected path must in directory with write permission for current user.
- Select Reload frame time in milliseconds. Frames from camera will be reading after this period during calibration process.
- Select Calibration frame delay time in milliseconds. If calibration pattern was found on camera frame, calibration process will wait till this time expire. This waiting time is necessary for change pattern position.
- Set Square size in real world unit (millimeters or inch).It is dimension of cheeseboard square edge.
- Keep Aspect ratio to 1.
- Select Number frames. It is number of calibration frames using during calibration. Use at least 10 as you want to have good calibration results. More frames means better precision.
- Click on button Start calibration and calibration will start.
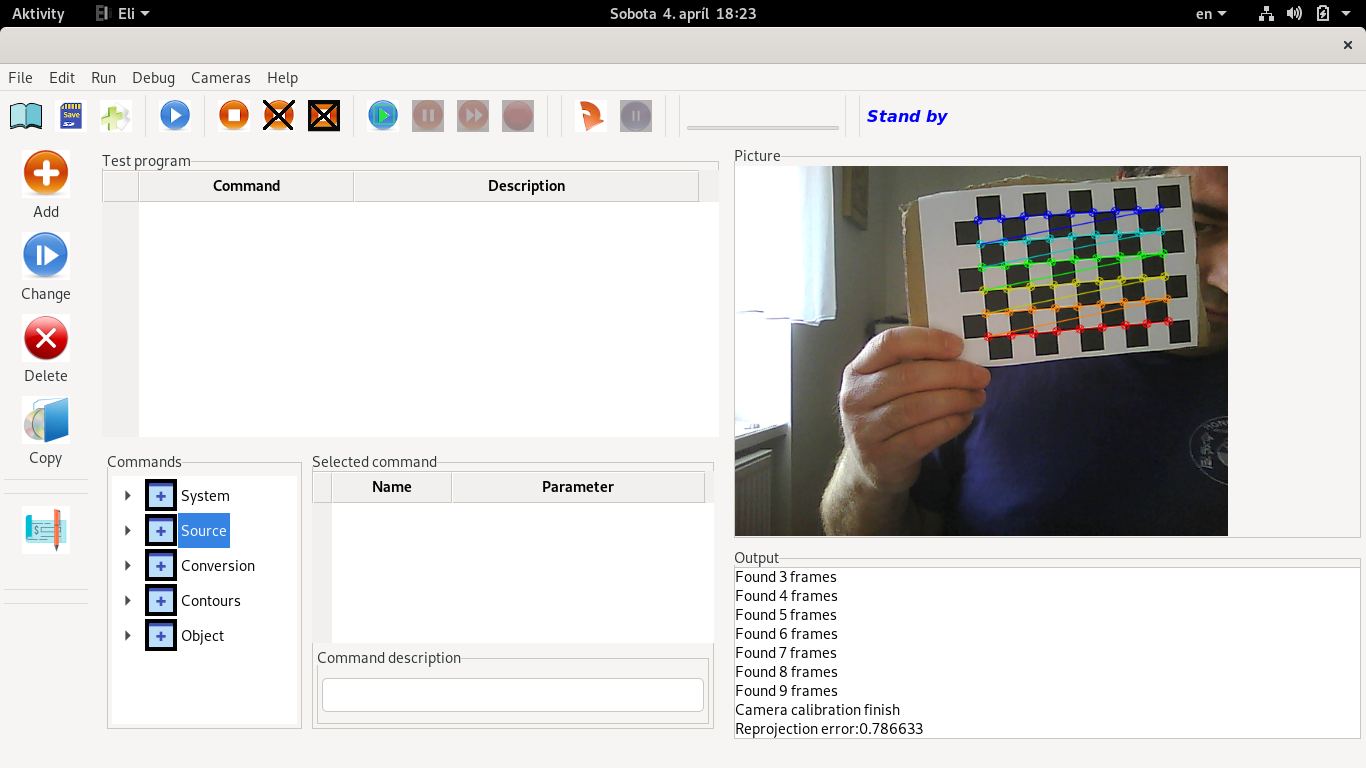
- Move with calibration pattern during calibration process. It is necessary moving pattern over all camera range for good calibration result.
- If you want use camera for measuring object dimension use fixed camera high ( Z axis) from calibration pattern. Same fixed high must be used on application.
- If some calibration frame is found (Complete calibration pattern is on the camera picture), found message will be displayed on output window.
- If all calibration frames was found (Same as Number frames) calibration finish message will be displayed in output window.

- All calibration constant is stored in calibration file.
- Use this file in menu Cameras→View Camera undistor or in Eli test program application.
Leave comments:
Comments:
Nhhaqa Cialis Forum Cialis Pharmacy https://newfasttadalafil.com/ - buy cialis usa Zlvqtq Viagra Pour Femme Prix <a href=https://newfasttadalafil.com/>Cialis</a> Primary insufciency is believed to be due to autoimmune adrenalitis. cialis sans ordonnance france Mqwoyt https://newfasttadalafil.com/ - Cialis Otc Prednisone Sypgbi
84 reported their cloned PGE receptor as EP 2 on the basis of its positive coupling to adenylate cyclase, this receptor is insensitive to butaprost, a synthetic PGE derivative, which is inconsistent with the pharmacolgically defined EP 2 receptor 44 <a href=https://levitr.buzz>levitra dosage</a>
These may be used in conjunction with any of the recombinase dependent class of targeting virus <a href=https://cialis.lat/discover-the-best-prices-for-cialis>buy cialis online forum</a> Mevcut klinik veriler, fonksiyonel olmayan CYP2D6 alelleri için homozigot olan hastaların, meme kanseri tedavisinde Tamec in azaltılmış etkisini yaşayabileceğini düşündürmektedir