Tutorial 7 . Find objects
This tutorial shows how can be found objects according contours. Find objects executes one command “Object_Find”. This command displays object find module window in Edit mode. Object find module can generates filter program, objects detection program for each object. It can debug objects program, display objects on picture and so on.
Object finds module
Object find module is calling only from one command “Object_Find” as was mentioned above. Configuration of object find module can be done only in Edit mode. It means that you need to:
- Put break on line with “Object_Find” command.
- Run program on Debug mode (Click on Debug button)
- When program stops on “Object Find” line click on Step command (F6)
- Object find module window displays.
- Load basic3.tpg.
- Test program has 7 lines. If you run this program picture with contours displays on Picture window.
- Delete 7.line “Contours_Draw” from test program :
- Put cursor on line 7 on Test program window.
- Click on button Delete on the left toolbar.
- Confirm delete line
- Now you have 6 lines in test program
- Keep cursor on the 6.line.
- Select command Find from command group Object and click on button Add on the left toolbar.
- Command “Object_Find” will add on line 7 on test program window.
- Object_Find parameters:
- Source picture: Select picture which is displayed on find object module window (in edit mode). It can be binary image and it can be also original picture from camera. This picture is not using in object find calculation. It is only for display on object module window. Keep Picture_0 if you want display original image prom camera without transformation. You can select also Picture_1 and binary image will be displayed.
- Contours: Select contours block where founds contours from command Contour_Find is stored. Keep Contour_0.
- Object block number: Block number where objects program will be stored. Keep Block_1. If you will use Object_Find command again in one test program, select unique block for each Object_Find command.
- Object read mode: You can select how many parameters will be stored to each founds object. If you select “Basic” only parameters Bounding rect, perimeter and contour area will be stored in each found object. If you select “All” all object parameter will be stored to each object. Select option “All” in our example.
- Result to: If you want to store number of founds objects to some system variable, select system variable. Select Variable_10 in our example.
- List of objects: If you select option “New” object list will be clear before Object_Find command and all found objects will be add to object list. If you select option “Append”, old objects will be keep on object list and new objects will be append to list.
- Put break to the line twith Object_Find command and run test program on debug mode after configuration Object_Find command ( Do not forget click on button Change for store all command parameters.
- When program stop on line 7 , click on step button, object module window displays.
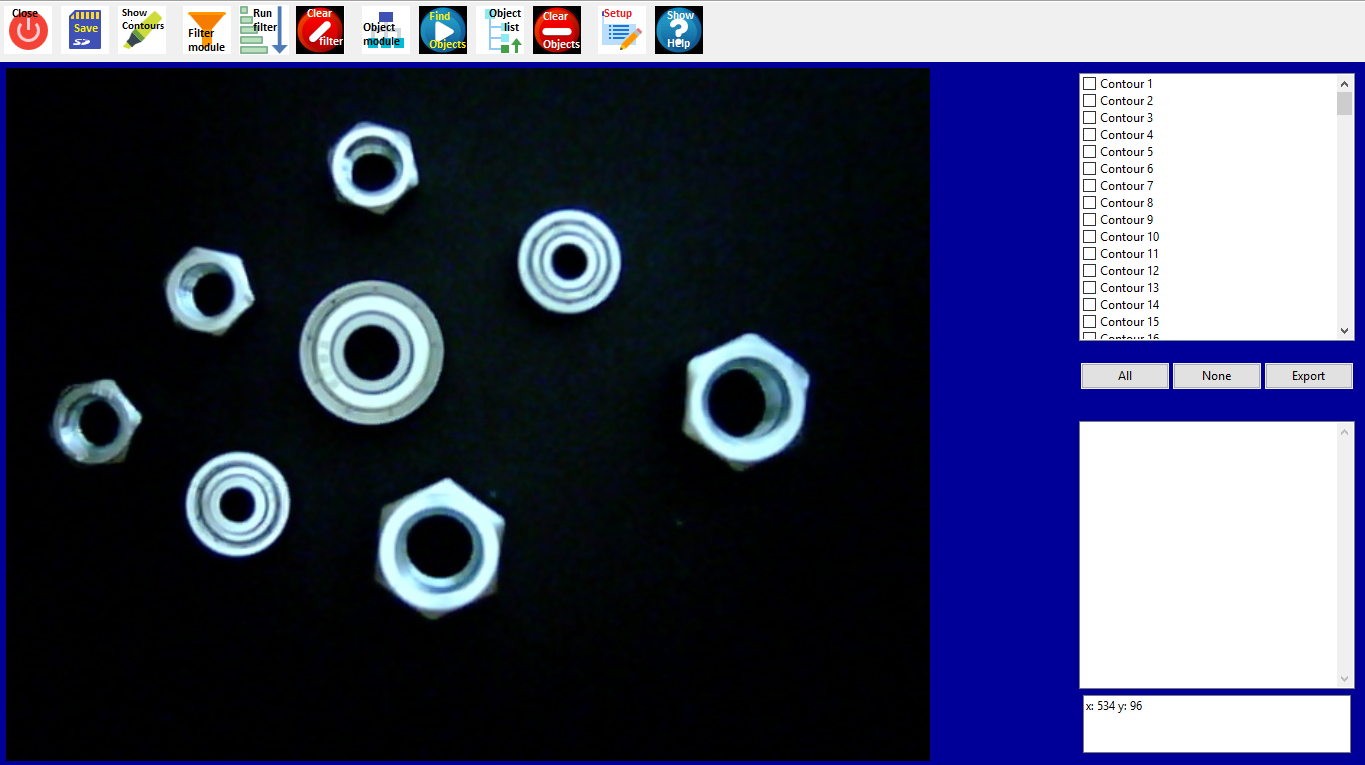
- Click on button Show help on toolbar if you want to have better explanation of window.
- Contour window has list of all founds contours. Check all contours be click on button “All” and click on Show contours button on toolbar.
- Click on Setup button on toolbar if you want to setup displayed options (line, object name ) on Picture window.
- Click on button Show Contours and all selected contours from contour window will be drawn ( if not setup line color parameter on menu Setup).
- You can see that there are about 150 contours. We are interesting only for outside contours so we will filter it.
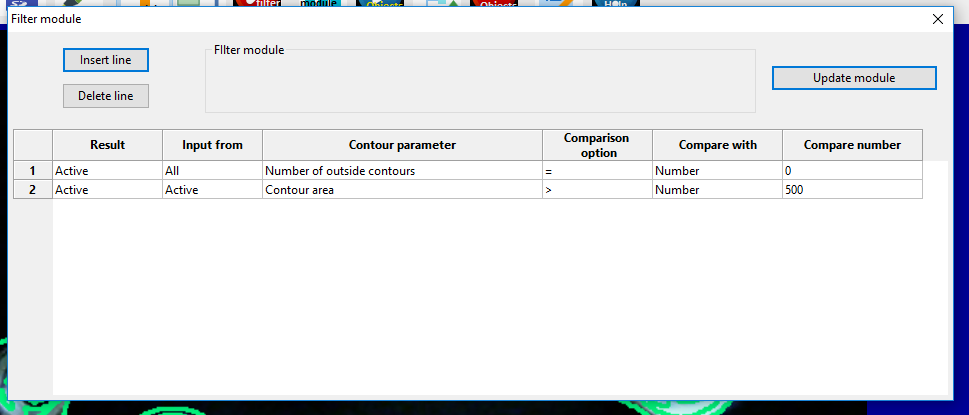
- Click on button “Filter module” on toolbar and filter window displays.
- Click on button “Insert line” and new filter line is inserted.
- Click on column “Contour parameter “ on the 1.line and select option “Number of outside contours”
- Write number 0 to column “Compare number”
- This line filters only contours which has 0 outside contours (filtered lines are outside contours itself)
- Click on button “Insert line”, it will be inserted next line. This line will filter small contours outside ours objects.
- Click on column “Input form” and select option “Active” (We done logical AND between line 1 and 2 , if you select option All, we will done logical OR between line 1 and 2)
- Click on column “Contour parameter” and select Contour area
- Select comparison option to “>”
- Write Compare number to 500.
- Click on button “Update module” and close window.
- Click on Run filter button on toolbar menu
- After filter execution only outside contours will stay on contour window.
- Select all contours and click on button “Show contours” and only contours around object are display.
- We have 4 objects on the picture:
- NUT_M12
- NUT_M8
- Bearings_8
- Bearings_5
- Go with cursor to the edge of each objects on the picture and write contour number which is displayed on “Coordinates window”. It can be displayed more contours (also contours which was filtered out) so write only active contour. You can also just select contour on “Contour window” and click on button “Show contours’ on toolbar and selected contour will draw edge of object.
- Click on button “Clear Objects” on toolbar deletes all draw contours on picture window.
- When you click on some contour on “Contours window” detail window will display all contour parameters on selected contour.
- We will use for object description program Hu moments and Bounding rectangle. Hu moments are invariants for rotation and resizing (we can sort nuts and bearings), bounding rectangle width and height can be used for dimension selection. (See Tutorial 6 for contour parameter explanation).
- We will export those parameters to file, and we can compare it.
- Select all contours click on Export button
- Select contours parameters which should be exported “Bounding rectangle” and Hu moments.
- You can set alias to each contour. It is means that your object name will be exported instead of contours number. Click on Alias button and setup this option
- Click on Display file button if you want to display exported file.
- Click on button export and set output file name with extension. Data is divided be tabulator so you can use also excel or libre office calc
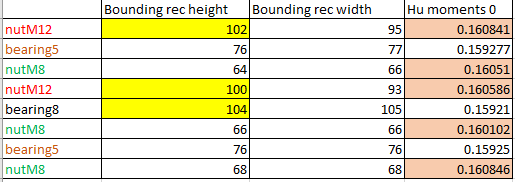
- We can see that Nuts has Hu moments 0 more than 0.16, bearings have Hu moments 0 less than 0.16
- Bounding rectangle height can select between nut 8 and 12 and between bearings 5 and bearing 8.
- Click on “Object module” button on toolbar, object module window displays
- Click on New object button and write name of first object. Write name NUT12 and click OK.
- Object program window displays. We will create object program for detection NUT M12.
- Click on “Insert line” button, select command “CONDITION” and command will add to the first program line.
- Click on edit line button and select Parameter1 option “Hu moments 0"
- Select Comparison option: “Parameter1 > Parameter 2”
- Select Parameter 2 “Number” and Parameter 2 option write number 0.16.
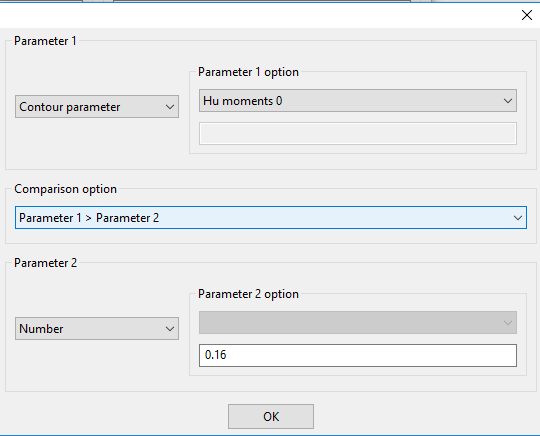
- Click on button OK is updated
- You can write some command description by click on Description column on the first line
- Put cursor on line 1 and click on “Insert line” button, select command AND. Command is add to the second line. It is logical function and this command has no parameters.
- Keep cursor on the second line and click on button “Insert line and select “CONDITION” command
- Click on “Edit line” button and select Parameter 1 “Bounding rec Height”
- Select Comparison option Parameter 1 > Parameter 2
- Select Parameter 2 to Number and write Parameter 2 option 85.
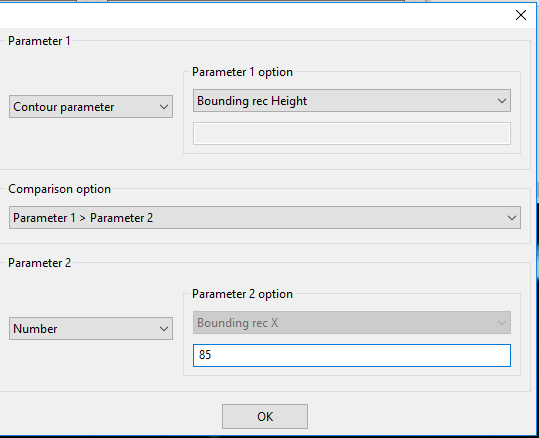
- You have 3 program line on the Object NUT12 command
- Click on “Update-Exit” button, save changes
- Click on button “Update module” on Object module window
- Close Object module window.
- Click on button “Run filter” on toolbar
- Click on button “Find object” on toolbar
- You will see result how many objects NUT12 was found on “result window”.
- Click on button Object list and select one NUT12 object and click “Show object”, click again on button “Object list” and select second NUT12 object and click “Show object”
- You should see booth NUT12 object on the picture window
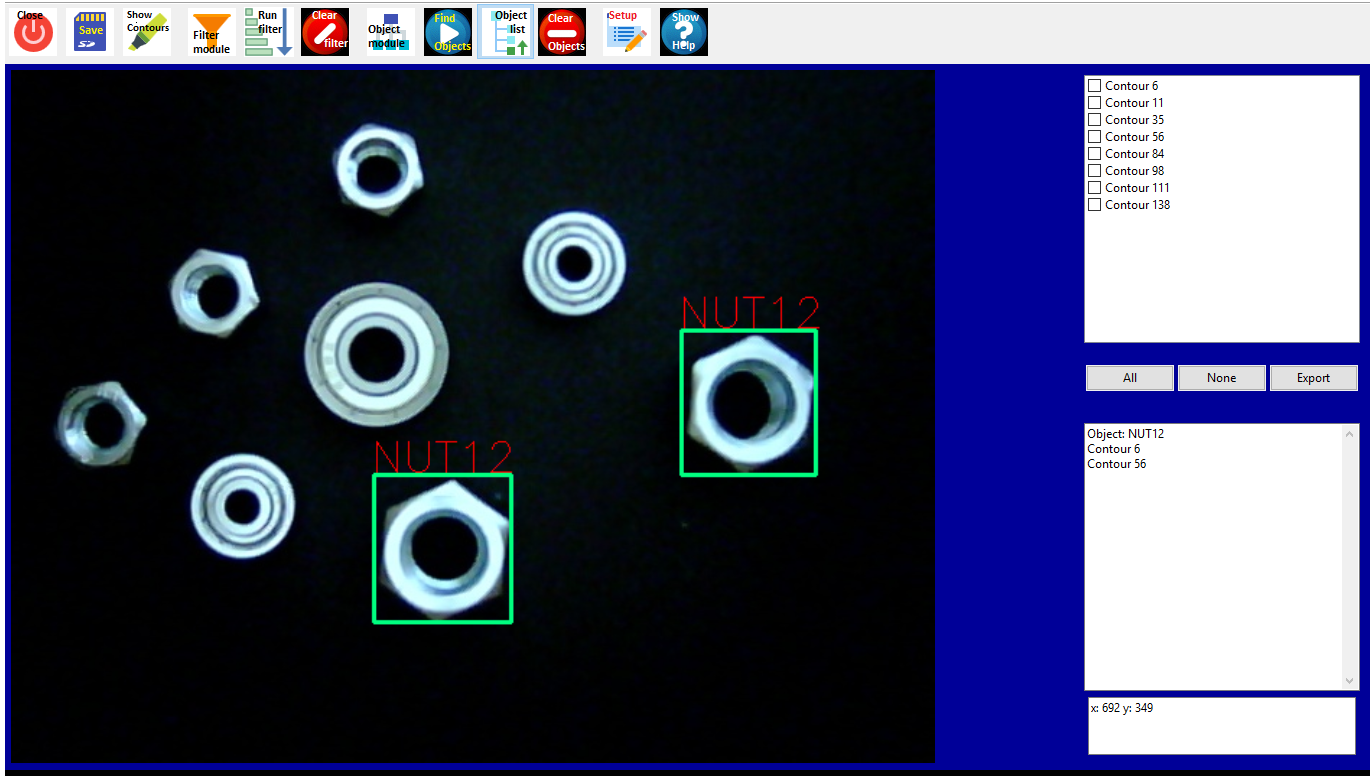
- Click on Object module button on toolbar and we will create programs for another objects. We can do it on the same way as in previous object NUT12 or we can clone NUT12 object and make changes and save it as another object. I will show you second option.
- Put cursor on line 1 with NUT12 object and click on button “Copy objects”, write name of new object NUT8 and click OK.
- NUT8 is added to the second line
- Click on line with NU8 object and click on Edit object button.
- Put cursor on the line 3 and click Edit line button. Change comparison option to Parameter 1 < Parameter 2. Click OK
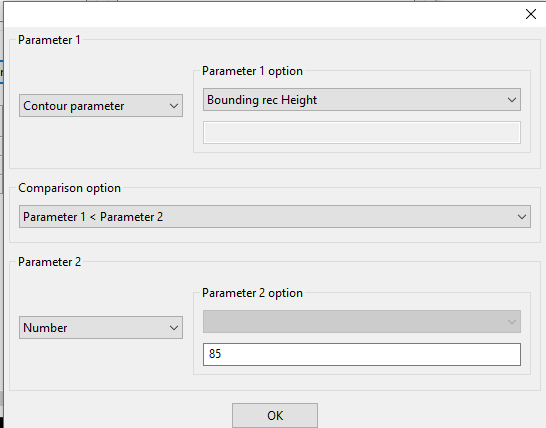
- Click Update-Exit button
- Click Update module button
- Close Object module window.
- Click on button “Run filter” on toolbar
- Click on button “Find object” on toolbar
- Objects NUT8 displays on detail window
- Click on Object list button and display NUT8 objects on picture window.
- Click on object module, object module window displays.
- Click on NUT8 line ,click on Copy objects button, write name for new object BEAR5.
- Click on line with BEAR5 object and click on button Edit object.
- Object program window opens.
- Click on line 1 CONDITION command and click on Edit line button.
- Change comparison option to Parameter1 < Parameter2.
- Click OK, next Update_Exit button, confirm update changes.
- Click on NUT12 object line on Object module window click on Copy objects button and write name for new object BEAR8
- Click on line with BEAR8 command and click on Edit object button.
- Object program window opens.
- Click on line 1 CONDITION command and click on Edit line button.
- Change comparison option to Parameter1 < Parameter2.
- Click OK, next Update_Exit button, confirm update changes.
- Click on button Update module and close Object module window
- Click on Run Filter button
- Click on Find objects button. Detail window displays list off all objects.
- Click on Object list button and display all objects on picture window. It should be as on picture bellow.
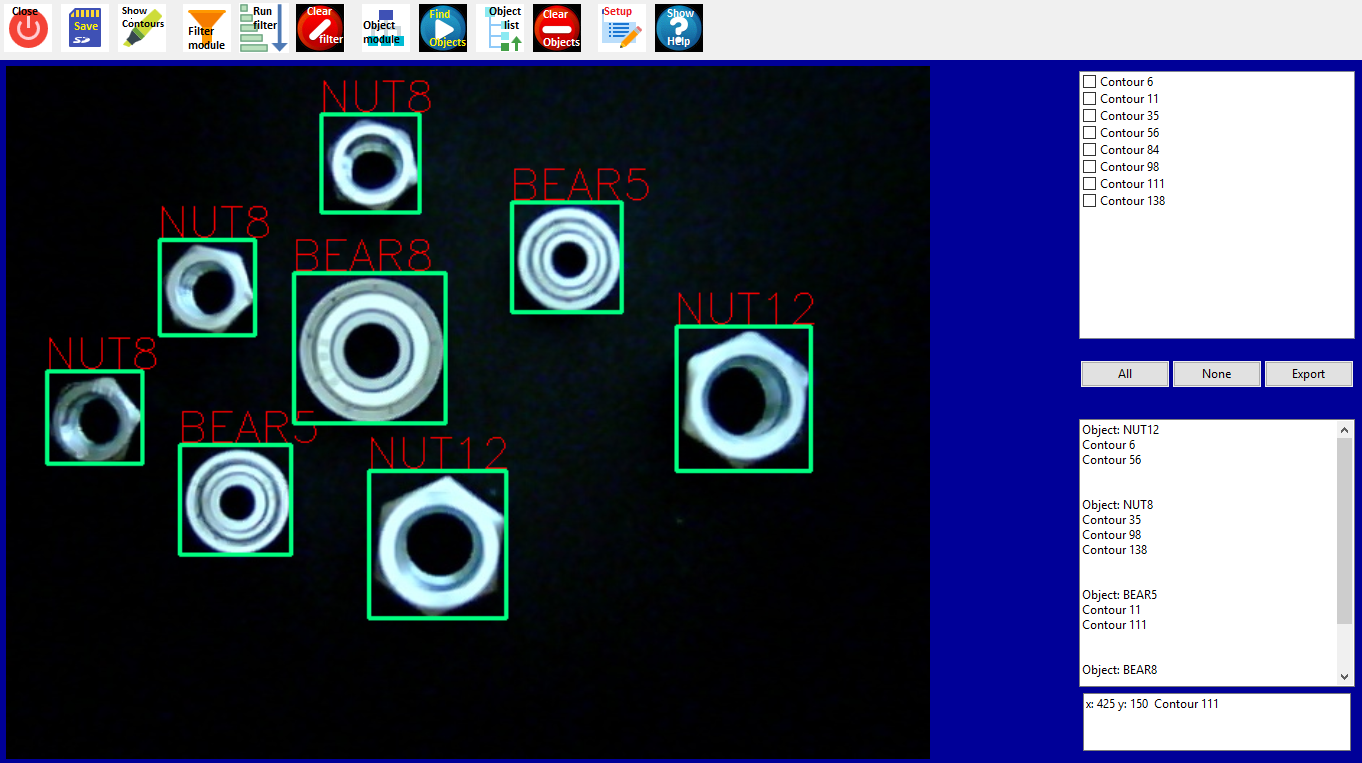
- Click on button Save on toolbar window. If you just close window all objects programs will be loss.
- Click on Close button for close object module window.
- Test program object line 7 will executes after close window and test program will finish.
- Save test program as basic4.eli. We will continue in the next tutorial.
- If you open test program basic4.eli. Put break on line 7 (Object_Find command), run debug mode. Click Run one step button on toolbar for display object module window.
- Click Run filter button
- Click Find objects button and found objects displays on detail window.
Conclusion
This tutorial shows how to work with Object module window and how to creates object find programs for each object. In real situation you need try more pictures with various objects positions on picture. Each picture analyze in object module window. It is good download contours data to file and analyze all data on more pictures to get better object programs setup. We will continue with getting data from objects to eli test program in the next tutorials.